 Skip to content
Uncategorized

Wondering how you can work on your child’s gross motor development without fancy equipment? Below are 5 activities that address strengthening, balance, motor planning, coordination, and range of motion, all using just one simple object you likely already have at home—a balloon!
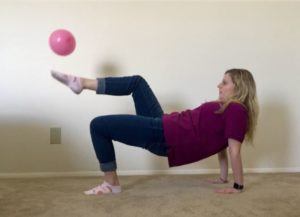
1. Bench Pose Balloon Float: Start sitting on the floor with your hands and feet flat. Lift your bottom up off the floor and keep your belly flat. With your hands flat on the floor, use your feet to keep the balloon in the air, kicking with one foot at a time. You may have to crab walk to keep the balloon from falling. Add another challenge by switching between hitting the balloon with your hands and feet. This is a great way to address balance, coordination, and strengthening.
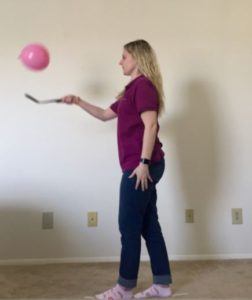
2. Heel-to-Toe Standing with Spatula Float: Standing on a line with one foot in front of the other, heel to toe, use a spatula to keep the balloon floating in the air. You can use sidewalk chalk, painter’s tape, or even a cell phone charging cord to make your line! Make sure your toes are pointing forward and try not to step off the line! You may have to switch the spatula between hands. You can double the fun by hitting the balloon back and forth with a partner. This activity focuses on balance and coordination. If you don’t have a spatula you can use a fly swatter, a paper plate taped to a stick, or your hand.
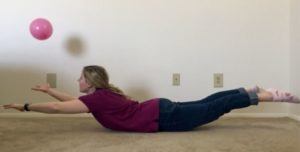
3. Superhero Flying: Start with lying flat on your stomach and your arms stretched out in front of you. Keeping your arms and legs straight, lift them up off of the ground. Use your arms to keep the balloon from touching the ground. You can pretend the balloons are birds you want to avoid flying in to! Have a grown-up time you to see how long you can keep the balloon in the air without letting your arms touch the ground. This is a great activity for strengthening!
4. Kneeling on a Cloud: Using a large pillow, sit with one knee down and one foot flat, keeping your bottom off the pillow. Have a friend shout out various body parts for you to use to keep your balloon in the air. For example, your elbow, head, foot, or nose! This is a fun activity to work on labeling body parts as well as coordination and balance. Don’t forget to switch feet!

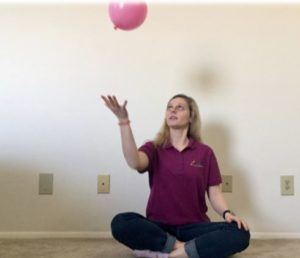
5. Criss Cross Applesauce Float: Does your kiddo frequently sit in the “w” position? Try this fun activity to encourage increased hip mobility with criss cross applesauce. Keep the balloon in the air using only your hands. You can hit the balloon back and forth with a partner to encourage reaching outside of the base of support.
Have questions about your child’s gross motor skills? Visit our website for a checklist of age appropriate skills and more information: http://www.abcpediatrictherapy.com
Mariah Cottrill, PT, DPT Physical Therapist

When it is time to give up the bottle, many parents struggle with what cup is developmentally appropriate for their children as they grow. There are so many options available on the market, it can be overwhelming. It is also common that children and parents want to hold onto the bottle as long as possible due to the comforts it holds even when this is not developmentally appropriate to continue use of the bottle.
By the time infants turn 6 months, they begin to show interest in cups, especially the ones their parents are drinking from. Infants can begin to drink from an open cup held by an adult as early as 6 months and exploration of the cup should be encouraged. It may be messy and there will be spillage. The bath tub is a fun and inviting solution to the messiness starting cup drinking provides! Allow the child to become messy and learn while getting clean all at the same time. In order for proper oral motor development and growth to occur, it is optimal that infants transition completely off of the bottle by 11-12 months. The earlier practice begins, the increased comfort with an open cup and the easier the transition from bottle to cup will be.
When teaching your young one to drink from an open cup, there are many tips and strategies to help increase success and learning. Start with using a small cup with a small amount of liquid with a soft rim to reduce spilling and encourage proper pacing (i.e. Dixie cup). It is important to allow practice with a variety of cups and avoid hard spout sippy cups. A sippy cup is not a necessary step, however, if you are going to use a sippy cup use one with a soft spout which allows for more challenge and development of oral motor skills. If you need a closed cup due to traveling or fear of spillage, 360 cups and lidded cups are a great option. It allows for development while also providing a way to decrease mess for caregivers. If using a soft spout sippy cup during travels, make sure to practice with open cups at meal and snack times. By 22 months, children are usually able to drink from a cup held with one hand with very little loss of liquid.
Examples of Types of Cups to Try:
Open: Mini or Tiny Cup by EZPZ, Green Sprouts Learning Cup
360: Munchkin 360 cup, Munchkin Splash Toddler Cups with Training Lips
Soft spout sippy cups: Nuby Two Handle iMonster No-Spill Super Spout Cup, Munchkin Latch Transition Cup
Practice cups: Dixie Cups
Teaching Open Cup Drinking:
For open cup drinking, the first thing infants need to learn is how to maintain contact with the cup to their lower tip. Move slowly and allow them time to adjust to liquid flowing into the mouth. When teaching cup drinking, hold the cup to their lip and tip the cup up and down for drinking and pauses while maintaining the contact to the lip rather than taking it away. Encourage practice of jaw stability by holding the edge of the cup with teeth while drinking. In addition, try altering the thickness of the liquid to learn control over the flow rate and management of the liquid within the mouth. Ways to thicken liquids include making smoothies, using baby rice cereal, and artificial Thick It.
Warning Signs:
if your child is coughing following eating and drinking, her or she could be aspirating (breathing in liquid). If you notice this, stop what you are doing and consult your doctor. There are many factors that could be in play including: liquid thickness, liquid flow rate, and swallowing difficulties. You will want to talk options over with your doctor prior to continuing.
If you follow these tips and strategies starting early on, you should have a successful cup drinker on your hands. Have patience! It is a trial and error process, so it may take time.
For more information, visit http://www.abcpediatrictherapy.com

- Read a story aloud and have your child answer a variety of questions
- Between the ages of 4-5 children should be able to answer and ask wh- questions independently (who, what, when, where and why). This is also a way to work on story recall (preschool aged children should be able to recall 2-3 details from a story read aloud).
- Do a scavenger hunt with letters/numbers
- Children who are in preschool should be able to follow 3 step directions and are working on identifying letters of the alphabet and numbers. Have your child hide the objects and provide directions on how to find the object.
- Play I-Spy around the house or outside
- I-Spy encourages children to work on their colors, shapes, and forming of complex sentences all while having fun! This is a great way to build a child’s vocabulary.
- Pretend play activities (baking, playing house, dressing up, building with blocks)
- Children love to play pretend! Pretend play works on following multi-step directions, understanding time concepts, answering questions, building vocabulary, and social interactions/turn taking.

- Touch and feel bags
Hiding different objects in a bag is an excellent way to work on descriptor words. Have the child place their hand in a bag and describe objects to you. It is fun to guess the object they are describing
For more information, visit http://www.abcpediatrictherapy.com
Removing the fear of sight and sound of the clippers/scissors
- Slowly introduce clippers/scissors placing across the room and moving closer as tolerated
- Once tolerated nearby, slowly introduce sound by turning clippers on across the room and moving closer as tolerated
- Present preferred activity for distraction during introduction of clippers/scissors
- Utilize vibrating massager to desensitize sound of clippers
Removing the fear of the touch with clippers or hair
- Use of vibrating massager progressing from tolerating touch on extremities progressing to tolerating touch on various locations of head/neck
- Use of feathers and other items similar in texture to hair to play a game encouraging tolerating touch to different parts of the body including neck, arms, back, ears.
- Brushing protocol
- Encourage messy play
- Deep pressure/massage to scalp
Compensatory Strategies
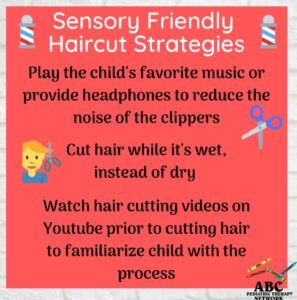
- Use of tools to reduce noise
- Headphones or earplugs
- Preferred music
- Use of scissors if clippers can’t be tolerated
- Wet hair instead of dry
- Use of something to prevent hair from touching skin
- Visor
- Turtleneck or towel
- Clippers that collect hair
- Hairdryer to blow hair
- Showering immediately following haircut
- Use of calming strategies during task
- Weighted blanket/compression clothing
- Fidget
- Preferred activity
- Brushing protocol
Tip: allow child to have some control by providing choices with use of compensatory strategies.
Additional Strategies
- Use of social stories
- Watching videos on hair cutting
- Pretend play with dolls or stuffed animals
- Playdough hair cutting tools
- Use of rewards
- Favorite activity for distraction
- Step by step picture schedule
- Timer
- Hair cutting apps (ex: Hair Salon)
- Slow, fun, non pressured progression of steps
- Engage child in activity by giving them a job (ex: hairdryer)
Tips: establish pleasant memories of hair cutting and replace unpleasant memories and increase frequency of task to keep pleasant thoughts in recent memories
For more information, visit http://www.abcpediatrictherapy.com

Strategies for Little Ones:
- Offer choices embedded into daily routines. This can be in ANY routine! Try offering visual options for choices of cups, shirts to wear, toys, snacks etc. This creates an opportunity for your little one to make a request by pointing, or imitation!
- Be sure to choose some time in your day to sit down and practice basic turn-taking. If Your little one is busy, it might mean they need to sit at a small table and chairs, or even their booster chair! If the toy is enticing you will sometimes be surprised how long they will attend and they will appreciate the one-on-one time with you!
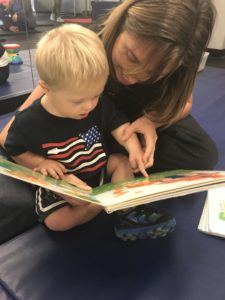
- READ books. This is best incorporated into a nighttime routine “books before bed”, but books are fun at anytime of the day! Be expressive and engage with your child to see if he/she can point to named pictures and explain what is happening in each one. When the children are under the age of 2, they might only need simple, colorful picture-board books or sensory “touch and feel” books are perfect choices!
- Get silly! Be expressive when you interact, get down on the floor and PLAY! You can roll a ball, play hide-and-seek, engage with simple cause-and-effect toys, simple puzzles, pretend play activities with a baby doll, cars, or dinosaur.
- Always talk about what you are doing during each routine. The more words your little ones hear, the better. They are listening and storing up the vocabulary words, in addition this allows for expansion of their expressive vocabulary and creates opportunities for verbal imitation.
- Even bath time can be a great time to build language skills! You can work on body part identification (i.e. “Where is your belly?”) You can model words like “splash”, “pour”, “uh-oh”, “in”, “out”, “wash”, sing songs while in the bath and play with bath toys or fun bath-safe paints.
For more information, visit http://www.abcpediatrictherapy.com
Calming strategies to help your child RETURN to the Green zone
Breathing Techniques
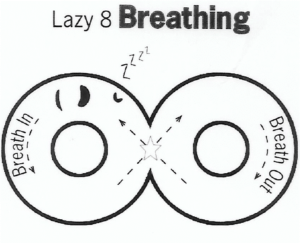
1. Lazy 8 Breathing – begin with your finger on the star. Trace around the left side of the eight slowly while breathing in. Then trace around the right side of the eight while breathing out.
2. Star Breathing – Begin at any point of the star. Trace your finger along the edge of the star and follow the sequence: Breath in for 2 beats, pause and hold 1 beat, breath out for 2 beats. If your child is unable to read, read the prompts aloud for them as they trace along the edge of the star.

Sensory Techniques
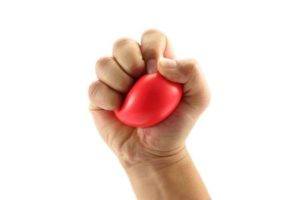
- Squeeze Lemons – Use your hands to squeeze pretend lemons or a stress ball 5-10 times slowly.
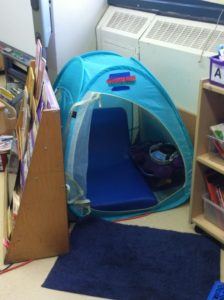
- Take a break! – Go to a quiet space in your home, like your room or in a child size tent to take a break. Help your child create a calm space by placing pillows, a weighted blanket, weighted lap pad, or a regular blanket into the corner of their room or in a small tent. They can practice other calming strategies here as well!
- Drink through a straw – Drinking water through a straw is a great way to help calm down one’s body. Or you can use a water bottle with a resistive lid to drink through.

4. Close your eyes and count to 10 slowly

For more information, please visit http://www.abcpediatrictherapy.com
These strategies require no special equipment, just your imagination and household items! All of these strategies can be used for increased sensory processing, self-regulation, calming, and attention.
Animal Walks
- Crab Walk
- Bear Walk
- Penguin Walk
- Tall Giraffe Walk
- Frog Jumps
- Bunny Hops
- Have your child walk like an animal to weight bear through all four limbs for increased calming and self-regulation.
Obstacle course
- Create an obstacle course around your house with your child using whatever you have! Set up couch cushions on the floor to hop across, crawl under a table, do an animal walk, or jump over a pillow!
- Your child will get plenty of input by running, jumping, and will also work on their problem-solving skills.
Wheelbarrow Walks
- Have your child put their hands on the ground and hold their legs up off of the ground so they are able to walk on their hands. If your child has trouble holding themselves up, try holding closer to their knees or thighs. If this is too easy for your child, hold closer to their ankles. You can make this activity extra fun by making it into a race, seeing how far they can go, or by putting this activity into an obstacle course!
- This weight-bearing through their arms is a great way to get extra input.
- (https://www.google.com/search?q=animal+walks&sxsrf=ALeKk00T2KdefN5ylbmOIZrR7GerFmvQdQ:1587756330386&source=lnms&tbm=isch&sa=X&ved=2ahUKEwjpu7-g5YHpAhUbLs0KHX60BFEQ_AUoAXoECBIQAw&biw=1366&bih=625#imgrc=mk2weTIDrLW1gM)
Blanket Burritos
- Spread a blanket flat onto the ground and have your child lay on one end of it. Then, roll them tightly up into the blanket, making sure it is a snug squeeze (but not too tight)! This gives them extra regulating pressure across their entire body to help them calm down.
- (https://synchronyot.com.au/2018/02/08/8-simple-activities-that-provide-body-awareness-input/proprioception-hot-dogs/)
Swinging
- If you have a swing set available to you, swinging is a great way to get vestibular input with your child. Otherwise, two parents or adults can hold a child’s hands and swing them into the air.
- (https://www.google.com/search?q=swing+set+clipart&sxsrf=ALeKk03bY4b34Cdu5l4tvHLm86a-maucqA:1587758573393&source=lnms&tbm=isch&sa=X&ved=2ahUKEwiQ2IXO7YHpAhXCX80KHTomBe0Q_AUoAXoECAwQAw&biw=1366&bih=625#imgrc=kZs0Sav_gNmP9M)
Shaving Cream, Play Dough, or Finger Painting
- Decrease tactile sensitivity in your child by playing with anything messy, like shaving cream, play dough, or finger paint! This is a fun way to get exposure to different textures and consistencies. If this is too overwhelming at first, have them touch the material with a q-tip or utensil and work your way up to using a finger!
- (https://www.google.com/search?q=finger+painting&sxsrf=ALeKk01GXFkwjmWpZcoVaSpAaU1jLpbdIQ:1587758705685&source=lnms&tbm=isch&sa=X&ved=2ahUKEwjpqpCN7oHpAhXJB80KHaVbAtkQ_AUoAXoECA0QAw&biw=1366&bih=625#imgrc=7npp4i_snY00-M)
Listening to Music
- This can either be a calming or alerting strategy. To use it as a calming strategy, play slow, quiet music to help a child relax. To use it as an alerting strategy, play your child’s favorite song or an upbeat song to have a dance party to!
- (https://www.google.com/search?q=listening+to+music+kid&sxsrf=ALeKk03LIOIoLzXyKxVaOfx7lM7KMO1rhA:1587759535405&source=lnms&tbm=isch&sa=X&ved=2ahUKEwjQseKY8YHpAhUQVc0KHRzfBVIQ_AUoAXoECBQQAw&biw=1366&bih=625#imgrc=_N1Z9gMmrzUIOM)
Yoga
- Yoga is a great tool to work on body awareness and to help calm and regulate a child. See if your child is able to get into the pose and hold it for 5-10 seconds at a time. You can help them as needed, but let them try themselves first! This is a fun activity to do together! Some good links to different poses to try are below:
- https://www.kidsyogastories.com/kids-yoga-poses/
- https://www.yogajournal.com/poses/yoga-for/kids
For more information, visit http://www.abcpediatrictherapy.com
The sun is shining, the air is getting warmer, and we can finally enjoy playing outside again. Why not make FUNctional use out of one of everyone’s favorite outdoor toys – sidewalk chalk! Here are a few ways to mix up the classic tool – keep it interesting and new for your kiddo and work on a variety of skills through these activities!
View this post on Instagram
- Drawing a person – Work on body awareness by identifying body parts, visual motor and prewriting skills of drawing simple shapes, and fine motor skills by simply grasping the chalk. You could even work on impulse control by having your child lay on the concrete as still as they can while you outline their body – no squirming allowed!
- Hopscotch – This is an awesome coordination activity! Your little one will learn motor planning and coordination skills. You can even challenge them by incorporating arm movements into the jumps – every time their feet are “out” their arms go “up” like a jumping jack. When their legs hop “in”, their arms go down to their sides. It’s harder than it seems to slowly coordinate the body together!
- Letter/number identification and formation – Have the letters drawn in chalk on the concrete and see if your child can use pebbles, sticks, grass, or chalk to trace or imitate the letters. The more they slow down and notice all the components of the letters, the easier it will become for them to write them themselves! Plus, the adventure of finding the supplies is a great sensory experience!
- Twister – We have all played the traditional Twister game, but why not make your own?! Draw a 5×5 grid of circles and put whatever it is your child is working on within the circles – you could work on letter identification, letter matching/associating, or site words! Have a deck of the letters/words to use to command your child of what to do and another deck with which body part to use. The first deck could have the match for the letter/site word or the lowercase counterpart to the letters on the Twister board. Make it a game to work on the skill. “Right hand on the letter that matches this <m>!”, “Left hand on <the>!”, or simply “Left foot on V (and show them a visual if they need it!)”. Not only will this be a fun way to practice visual perceptual skills, but you’ll sneak in some body awareness and left/right identification with the game, too!
- Target Practice – Work on visual motor, coordination, and math skills all in one activity! Draw a target on the ground and put numbers within them. Toss a rock and see if your child can practice their addition skills. Challenge them by having a “goal” number to add to so that they really have to focus on where they’re tossing their rock!
Have fun with how to incorporate such a simple item in a creative way to help your child grow and challenge their skills! Learning is done best when it’s FUN. (Just don’t forget to wear sunscreen ?)
For more information, please visit http://www.abcpediatrictherapy.com
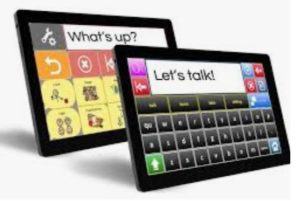
Getting your child a speech generating device (SGD) is an exciting step towards improving their communication and independence. It’s an exciting time, but it is not a quick fix and doesn’t mean that your child can immediately begin to communicate with you. A baby is consistently hearing verbal communication every day for a year or more before they begin using words and phrases to communicate, and the same goes for a child being introduced to a speech generating device (SGD). This is done in many places- therapy, school, the community, and most importantly, HOME! Language learning does not stop when your child walks in the door from a long day of school or therapy, and their SGD needs to be introduced and modeled by other people at home when communicating with the child. Here are some tips to help you incorporate your child’s speech generating device into your daily routine at home-
– Learn about your child’s device. Know where the vocabulary “buttons” are, how to navigate across the pages, and how to customize it to your child. Don’t be afraid to ask your therapist for help during this time, they are a great resource!
– Have their device present at all times. Think of the SGD as their voice, and remember to take it anywhere you would expect your child to talk with you while playing, eating, cleaning, or even doing homework.
– Model for the child on their device, and don’t be afraid to use the SGD yourself when communicating with them! Show your child how to activate the “buttons” of one or more vocabulary words from the phrase you’re saying verbally. This video can help you better understand this idea!
– Try to stay a step ahead of your child. A child doesn’t wake up using verbal phrases, and they aren’t going to do this with a device either. When modeling, try to show your child phrases that are a step longer than what they typically produce- if they are using a single word or button activation on the SGD to communicate, try to model two to three-word phrases on their device so that they are consistently seeing and hearing gradual expansions of their productions.
– Help the child use their device outside of the home as well. Places like the park, grocery store, and restaurants have many opportunities to model new vocabulary and encourage requesting from your child!
It’s important to consistently reinforce what your child is learning at therapy and school at home so that they are generalizing their skills to new environments, and home practice can make a big difference in a child’s ability to communicate in a variety of places.
If you have any questions about the use of speech generating devices or how to better help your child with their device, reach out to us at http://www.abcpediatrictherapy.com. We are here to educate you and inspire your child.
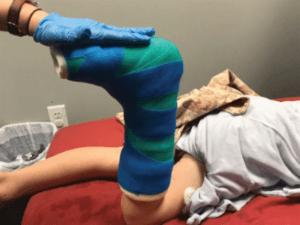
Kiddos who are chronic toe walkers or have increased muscle tone in their calf muscles lack the range of motion in their ankles to be able to walk with a normal heel-to-toe pattern. It also affects their balance and can cause muscular imbalances throughout the body due to using incorrect muscles to compensate. This then leads to difficulty performing and attaining new gross motor skills, leaving them behind compared to their peers.
In mild cases, this muscle tightness can be helped with a course of physical therapy and a home exercise program consisting of activities such as stretching, strengthening exercises, and gait training (activities to work on walking heel-to-toe). In more severe cases, however, physical therapy alone is limited. Research has proven that kiddos lacking a significant amount of range of motion benefit from something called serial casting. Serial casting can be used with kiddos who have various diagnoses, and has been proven effective in its ability to improve range of motion and quality of gait without interfering with their ability to perform daily activities. Serial casting is also a great alternative to surgery, and has improved results when followed by physical therapy and bracing.
Typically, the parent and kiddo come back into the casting room with the trained therapist. To make it less scary, you are shown the different materials and tools used, and the kiddo can even pick out their own cast color (and sometimes more than one color). To make it more fun, kids typically choose to watch a movie or play a game while the therapist wraps their leg. It is important to know that the cast can come off if need be, however each cast lasts for 1 week. That means each week, the cast is removed, the therapist gives the muscle a little bit more of a stretch, and then new casts are made. This process continues until the full range of motion is achieved; typically, 4-6 sessions. They are given special “shoes” that strap onto the casts, and the therapist makes sure that they can safely walk with them on before leaving. Each week, the kids have fun decorating their casts and can continue with their daily lives as normal, just with 2 cool new accessories.
After the 4-6 sessions and the casts are removed for good, the therapist will assess the kiddo’s ability to walk, and may prescribe a few follow-up sessions to address their walking mechanics and/or strength. It is important to know that this muscle tightness could come back. Therefore, it is important to monitor the way your kiddo walks and does activities, and to continue with the home exercise program to ensure that all of the progress that has been made is maintained. It is also important to know that orthotics could be recommended after the course of casting; orthotics vary in size from shoe inserts to braces that go up the leg. The therapist will prescribe and fit the kiddo based on their individual needs. Overall, this process is to ensure the best results, meaning that it prevents injury and/or surgery, helps your child to walk efficiently with a normal pattern, and most importantly allows them to become a more functional and independent child.
For more information, please see our website at: www.abcpediatrictherapy.com
Resources
- Brouwer, B., Davidson, L. K., and Olney, S. J. Serial casting in idiopathic toe-walkers and children with spastic cerebral palsy. J Pediatr Orthop. 2000; 20(2): 221-5. http://www.ncbi.nlm.nih.gov/pubmed/10739286
- Fox, A., Deakin S., Pettigrew, G., Paton, R. Serial casting in the treatment of idiopathic toe-walkers and review of the literature. Acta Orthop Belg. 2006;72(6):722-730. https://www.ncbi.nlm.nih.gov/pubmed/17260610
- Glanzman, A., Flickinger, J., Dholakia, K, Bonnemann, C, Finkel, R. Serial casting for the management of ankle contracture in Duchenne muscular dystrophy. Pediatr Phys Ther. 2011; 23(3): 275-279. doi: 10.1097/PEP.0b013e318227c4e3.
4.Main, M., Mercuri, E., Haliloglu, G., Baker R, Kinali M, Muntoni, F. Serial casting of the ankles in Duchenne muscular dystrophy: Can it be an alternative to surgery? Neuromuscul Disord. 2007; 17(3): 227-230. https://www.ncbi.nlm.nih.gov/pubmed/17303425
- Pistilli, EE., Rice, T., Pergami, P., Mandich, MB. Non-invasive serial casting to treat idiopathic toe walking in an 18-month old child. NeuroRehabil. 2014; 34(2): 215-220. https://www.ncbi.nlm.nih.gov/pubmed/24419016.
- Novak, I., McIntyre, S., Morgan, C., Campbell, L., Dark, L., Morton, N., et al. A systematic review of interventions for children with cerebral palsy: A state of the evidence. Dev Med Child Neurol. 2013; 55(10): 885-910. https://www.ncbi.nlm.nih.gov/pubmed/23962350
- Barkocy, M., Dexter, J., Petranovich, C. Kinematic gait changes following serial casting and bracing to treat toe walking in a child with autism. Ped Phys Ther. 2017; 29(3): 270-274. doi: 10.1097/PEP.0000000000000404.